I have 7 seldom spoken tips that will help you get better leverage for your Facebook business page. These are simple, quick and very easy to set up yet can make a world of difference to your Facebook presence. To access these settings you will need to be logged in as an Admin for the business page. Everything will be editable from the ‘Settings’ or ‘About’ tabs.

1. Get the essentials right
This may sound silly, but you need to get the essentials on your Facebook page set up correctly to ensure you are positioning your brand correctly. For example, you need good quality images for your main banner. Use an image that is aesthetically pleasing and will interest your customer. Sorry, but your fleet of trucks or products all lined up on the dining room table won’t cut the mustard.
I always put the company logo or icon graphic in the profile box as this is what will show every time you post to the page. Do not stretch or crop your logo to fit the space. Spend a little time getting your logo into the correct format (square) before uploading as this will position it in the best light.
Then fill in ALL of your contact details when clicking on the ‘About’ tab. Don’t forget to fill in the short and long descriptions, operating hours, links to Instagram, Twitter, MailChimp and any other apps you use. It’s surprising how many people leave all of this pertinent information out. This is a lost opportunity and there is absolutely no excuse for it!
2. Claim your Page name
It’s a great idea to ‘claim’ a URL name for your page. What do I mean by this?
Well, instead of Facebook showing your username as https://www.facebook.com/WRD.Creative-135675959856693/
You can claim your name and display it as https://www.facebook.com/WRD.Creative
Not only is this nicer to look at, but it’s easier to use in marketing and directing people to your page for them to easily find.
To claim your page click the ‘About’ tab and under ‘General’, Edit the Username. You will be able to choose a name of your choice. Try and keep it as close to your business name as possible to make it easy to remember. If the name is already taken you will need to compromise, but still, try and keep it as close to your brand as possible.

3. Verify your Page
If you want to appear higher in search results, you will need to verify your page. Under ‘Settings’ there is a tab called ‘Page Verification’. Click this and fill in your contact phone number. Make sure you are near the phone when you do this as you will immediately get a call giving you a 4 digit verification number which you will need to input into the open field.

4. Allow others to tag your Page
The more others can tag your page, the better exposure you will get for your business. To allow others to tag your business, you will need to head back to settings. There are two tabs that you can enable. The first is to allow other people to tag photos of themselves or friends on your page.
The second option is to allow others to tag your page in their posts. Now, there are some pitfalls to this. If you have keyboard warriors who decide to bad mouth you, then they will be able to tag your business. Fingers crossed this won’t be an issue for you and anyone tagging your business will be doing it to spread the word about how amazing you are.

5. Get suggested as a Page to follow
Have you noticed that when you ‘like’ a page, suggestions as to other pages you might like will pop up? The question is, how do you get onto that list? It’s simple. Back in your settings, there is a ‘Similar Page Suggestions’ tab that you simply need to click. Facebook will look at a number of algorithms to determine what is similar to your page to the one they have just followed. It might be industry, demographics, geographics or areas of interest.

6. Be quick to respond
There’s nothing worse than being left hanging – especially on social media where we think that everything is instantaneous! Firstly you need to make sure that people can actually message you. Go into ‘Settings’ and select ‘Messages’ (under the General tab) to turn on the feature for people to message you – by default this is set to receive messages.

When someone sends you a message or posts a question to your page, they are engaged and ready to interact. The quicker you can respond the better.
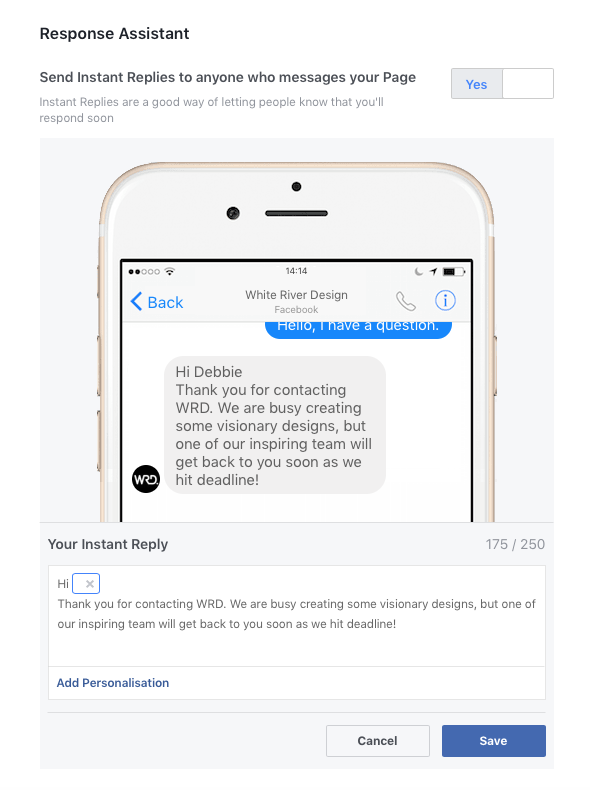
But it’s not always possible to be at the ready 24/7. This is where ‘Response Assistant’ works a treat! Once again under ‘Settings’, you need to click the ‘Messaging’ tab on the left-hand side. Here you will find a ‘General Settings’ and ‘Response Assistant’ set up. Under ‘Response Assistant’ you can create a message that responds immediately to any messages you might receive.
This at least lets the client feel as though their message is going to be actioned. Then you actually need to respond, but it does buy you a bit of time.
7. Set your notifications
Point 6 leads into point 7 as it’s important to know when people have commented or left you a message. Set up your ‘Notifications’ to ensure that you get an email or a push notification (on your phone) when someone corresponds with your business. Under ‘Settings’ and on the left navigation head to ‘Notifications’.
Here you can pick what you would like to be notified about. The busier your page the less you probably want to be notified. But if you are starting up, you might like to be notified when the page gets a new follower, check-in or review. Select what you’d like to be notified about and how to keep on top of your Facebook communication.

These few actions are just the tip of the iceberg when it comes to ensuring that your brand is set up correctly on social media for you to make the most of it.
If you are new to social media, check out the 5 biggest branding mistakes that businesses do on social media and make sure that you don’t fall into any of these traps. The team at WRD periodically run workshops to educate small business owners on social media, blogging, WordPress management, and MailChimp.
If you are interested in attending any of these events, please head to The Creative Fringe to see what is on, or email us to get put onto our waitlist.
If this post has been helpful to you, we’d love for you to share it on your social media pages.
Written by branding specialist Debbie O’Connor
Consultant, Strategist, Keynote Speaker